Sunday, March 10, 2013

CFP-90: test 2.0, Rappelling Kings Bluff


Kings Bluff has always been a great place to hang out for me.  You are always bound to bump into a few interesting people, it has the most amazing view of the Cumberland Lake, and there is a mega-ton of climbing routes to try out for climbers.  Needless to say, this trip has been long overdue. This morning we were blessed with wonderful weather and great people along the way and best of all I knew I was going to get some good rope time in along with some rigging to keep my practice up.  I would say that this bluff is anywhere from 90 to 100 foot drop from where I am standing and while rappelling down a 90 foot bluff is defiantly not an obstacle that a lot of people will ever come across its is always fun to know how to do. So if you’re like me and prefer to take the road less traveled then you are sure enough going to run into a spot where you can’t just get across unless you jump, climb, or drop. 
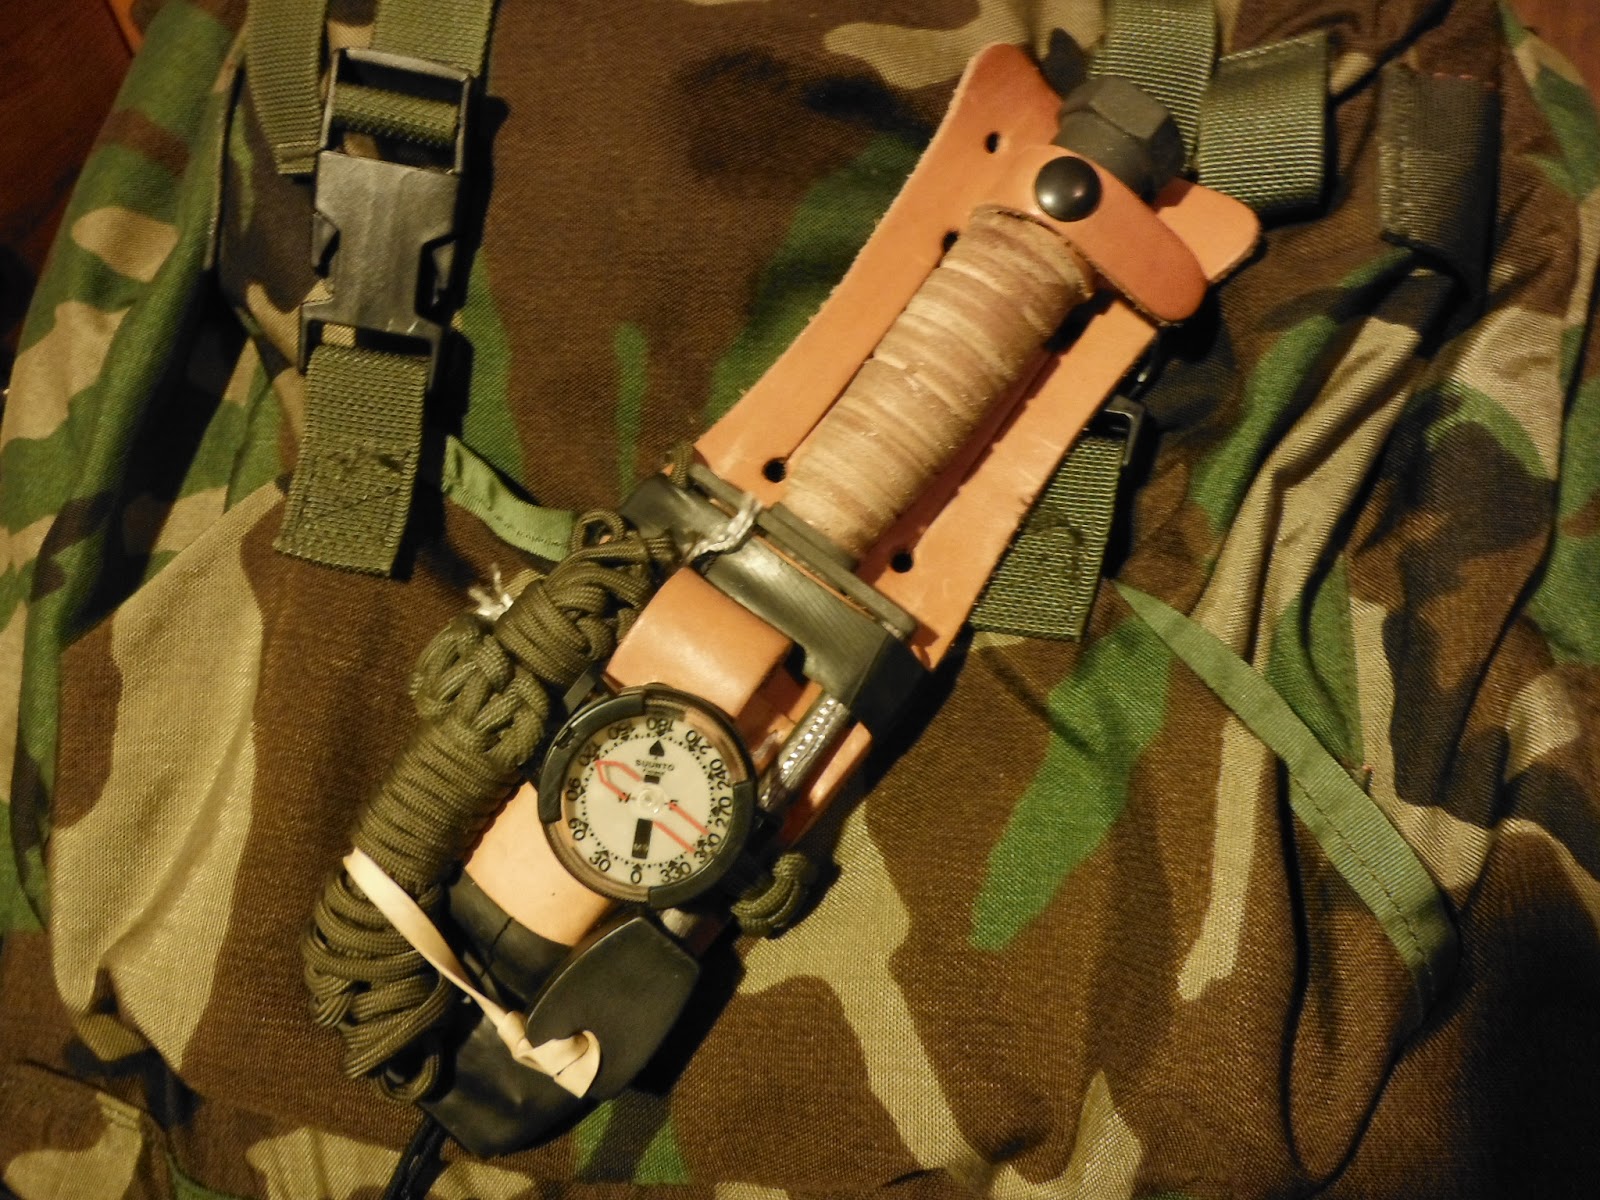
In the last two blogs I've already posted about my CFP-90 and how it has been really working out for me. This time I had it fitted with climbing/rappelling gear and surprisingly it held everything secure. No worries about losing anything on the way down because of all the ways you can strap gear to this ruck and lash it down.
          I fitted the pack with 150 feet of rappel rope, three carabineers, a rescue figure-8, and harness as well as my standard list for camping/bugging out equipment.  I will have to do an update on this blog later to 
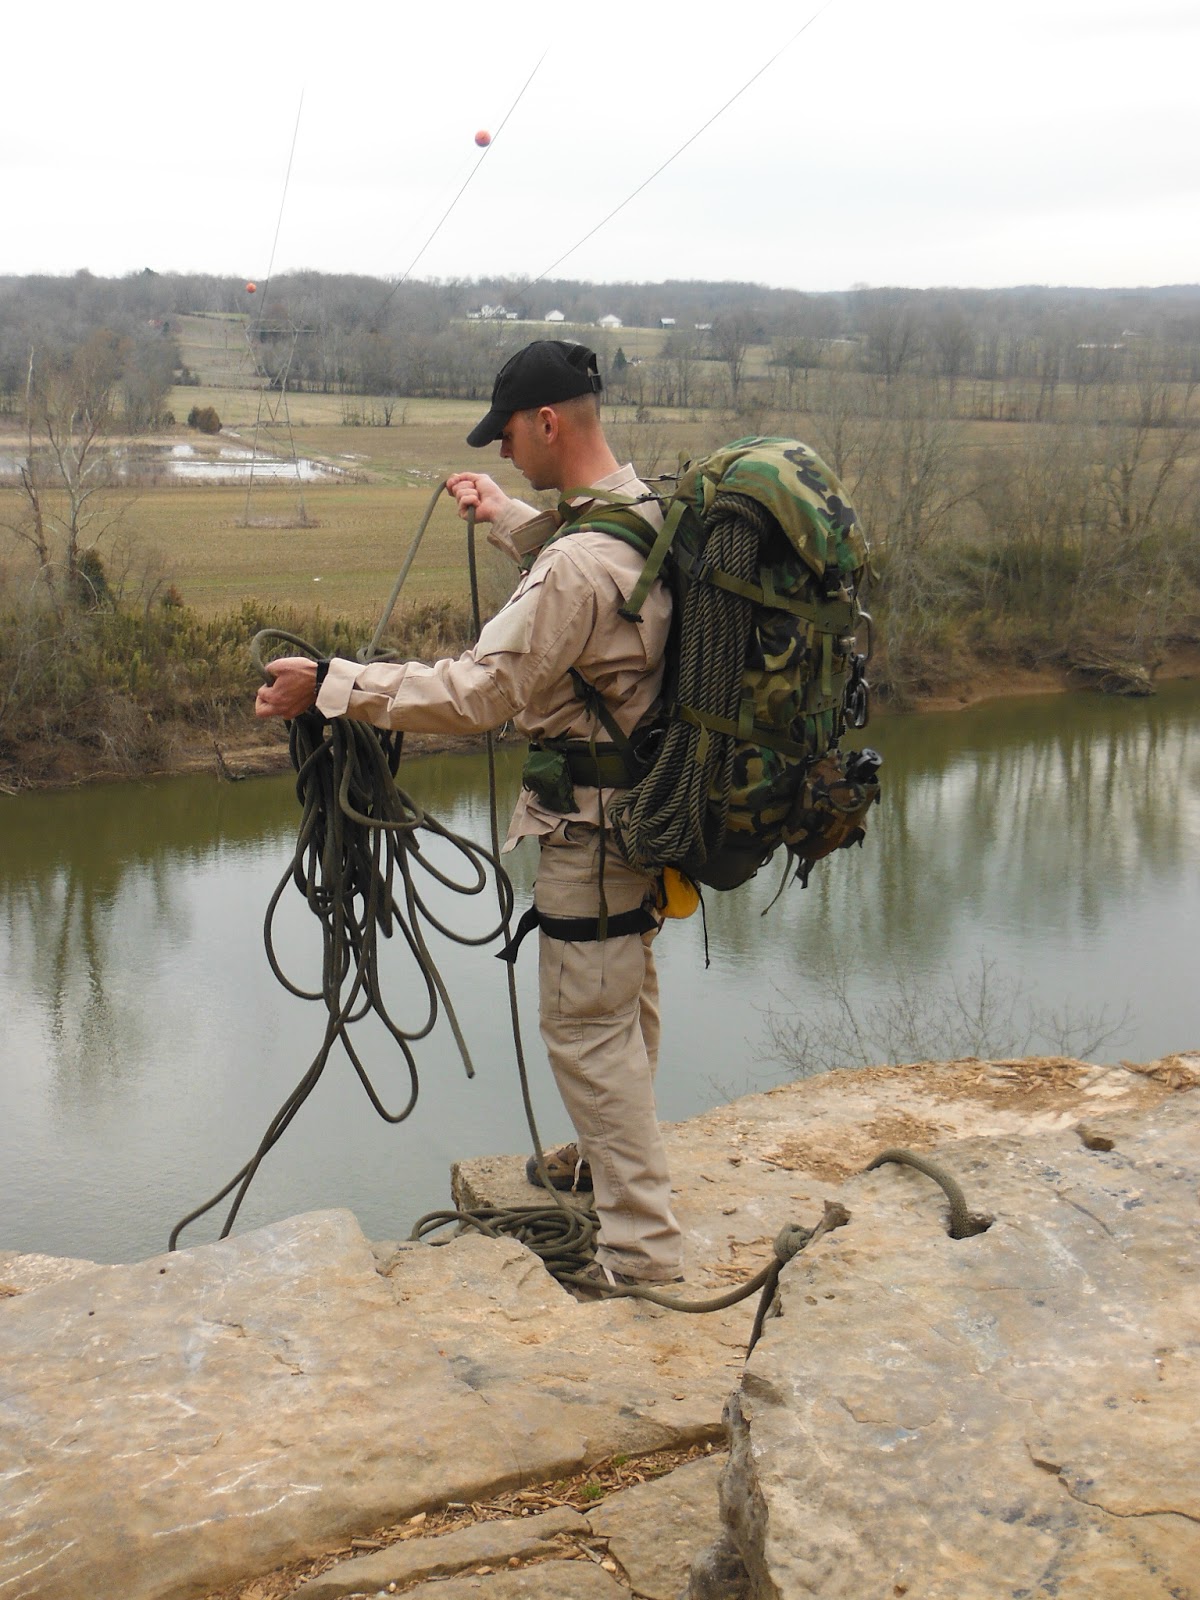
get the actual weight of the pack with climbing gear but I probably added an extra 15 to 20 lbs.  The side compression straps were perfect to secure my rope to the sides. The midsection of the rope went under the top flap portion of the ruck. The walk up to the jump off site was short, approximately ¼ miles but allowed me to get a feel of how this would fair on a trek for longer distance.  Again this pack does an amazing job of disturbing weight so there was little concern as being able to go a few miles like this. Though I will say, unless you are certain that you would run into deep canons, bringing 150 feet of rope was probably a little a bit of over kill.  I could most likely get by with half of that amount on a normal hike or better yet test out some other ideas.  I've seen some YouTube videos with people using 550 Para-cord to hold themselves from a tree and such; I’ll have to look into that more on an extension of this blog. So, to be carrying 150 feet is just not practical unless some proper recon has already been done and you know your going to need that much.  
     After all my knots are check and rechecked I’m ready to look over the edge and feel my heart race again.  This one of the reasons I love climbing so much, it’s almost like the first time you kiss a girl or ask someone you really like out for the first time.  This is my love and she gets me every time we meet.  I allow my weight to set into an L-position and start feeding rope though my rescue-8 slowly. I slowly allow the rope to rest at the edge of the bluff.  Once I feel everything is resting right, I kick off the rock with all enough force to send me flying through the air, 90 feet and dropping. My heart is racing a little more as I try to take everything in, halfway down the side of the bluff there is a cut in where a tunnel or cave is and I startled some climbers that were curious about this so went inside the cave to explore (So many reasons to love the Bluff).  There’s nothing like a visit from some strange guy falling from above right? J After a short bit of chat, I take a few more bounds off the bluff and land gracefully to the ground.

          As a review of how this pack handled this event, I think I would be tempted to say this pack was made for mountaineering because of how secure you can attach the type of gear you would need in this terrain.  I never once felt off balanced or out of control.  I don’t think I can express how awesome this pack is!  I've been trying to think of things I would change about the pack and how it handled getting too and going down, bounding through the air and the steep climb back up. was no problem at all so I had to do 
the rappel eight more times and tried different ways to hook up and tie into the line. There was one trip down where I allowed myself to land on my back (carefully of course) and if you had a fatal hook up or the rope slipped from you somehow and landed on your back, there would be a good chance that it would take a tremendous amount of the shock that could have otherwise ended much worse. Because there is no external frame of metal or plastic that would act to injure you during a fall could land you on your spinal column.
I still have a deep water crossing to try out with this pack soon when the weather gets a little better as well as a 10 mile trek. I think I'm just trying to find more excuses to get out there and try new things because of the fun you can have. To all that do read my blog, I hope that you enjoy my stories and look forward to the next chance to explore the outdoors.

          One last thing before I close this, to everyone that was out there during this little adventure  3/10/13 and reading my blog, I want to say you guys were great, CLIMB ON! 

GI Survival Pilot Knife: Ontario 499


G.I. Survival Pilot Knife
Ontario 499 vers.
     Have you ever found yourself in a plane flying overseas and headed to a dense jungle? Suddenly your engine fails and the next thing you know, you have to cut your way out of the side of the metal fuselage for whatever reason then eject with a raft only to paddle to shore and fight off wild boars. Nope? Well somebody out there thought it could happen and made this knife for the U.S. Air Force.
A quick overview of this knife if you have never seen or used it:
  • v  This knife fixed blade knife is made of 1098 carbon steel, clip point design
  • v  Rat trail tang
  • v  Coated in a Parkerized finish 9.5 inches with a 5 inch blade/ serrated on the spine

  • v  Leather wrapped handle and leather sheath
  • v  Hexagon steel butt cap (originally for use on the raft to close off air values and assemble in the end of an oar)
  • v  Three small holes in the hand guard to lash as a spear.

          Most of us would never find any use for the military’s intended features of this knife but for some reason many of us are dawn to its nostalgic appearance and make use of it today. I happen to be one of these people so this will be bias as I absolutely love this knife.  This Ontario 499 has a solid feel and as a former combat engineer I take great pride in the “adapt, improvise, and overcome” thinking.  What a knife needs to do for anyone into survival/bushcraft will vary from person to person and what their kit already contains. My kit already contains a Gerber folding saw so what this knife needs to do is help make traps, clean game, and assist in fire making and shelter building.  The saw back was made to cut aircraft metal but also works well for making notches into wood for traps and shelters. I have used this knife to clean game already and the blade on the top works like a gut hook. For the all-important fire making tasks, this knife will baton wood, and do some light chopping and the saw back again will throw some incredible sparks with a feral rod. The heavy butt cap works great from driving stakes in the ground for traps too! Another note as to a frequently brought up debate is the density of knifes.  This is a softer metal (1098 carbon) than many of the newer knives out there on the market. This means that I and anyone else can sharpen this blade without fancy expensive diamond tools and expert training.  I may have to sharpen my knife more often but this gives me better practice and the ability to do this anywhere.

            What makes a regular knife into a survival knife? How you use it from what you know! The greatest weapon is the human mind. For my knife I have modified the leather sheath to make this more of a “Kit” for survival and outdoor tasks. To start I have three ranger bands (bicycle tires cut to needed length) and two slipped on the bottom to create a pocket and another towards the top to hold more items in place.
Items
v  Six different size fish hooks and thirty feet of fishing line are held in the ranger band pockets.
v  A fire starter is held in place with the top ranger band
v  550 para-cord is held on the opposite side of the metal match.
v  Two safety pins are secured to the back.
v  Sharpening stone is held in the center pocket of the leather sheath.
v  M-9 Suunto watch compass is wrapped around everything and this gives me a second opinion to a compass bearing.
In all this one kit has now provided me a cutting tool, combustion means, cordage, compass, needle for a number of tasks, food procurement, the ranger bands themselves will burn black for signaling, and I have a way to keep my edge sharp.  I plan to use a leather treatment to prevent the handle and sheath from becoming damaged from the elements.
            I find myself using this knife more and more as I get out on my treks and other outings.  I think if I can find a way to add a lanyard to the butt cap would be helpful as well as another mod that will help me determine distance and angle heights. Another blog for another time on that project.  

Wednesday, March 6, 2013

CFP-90 Pack test 1.0 quick hike

The other day I was able to do a quick scramble/last minute hike with my bug out bag for conditioning as well as a performance check.  I like to incorporate my family and friends with the trips when I can to get great feedback as well as give a reason to get outside.  This is a great way to have a little encouragement and someone to hold the camera when a great shot presents itself. The initial purpose of this excursion was to test the comfort level at a moderate pace with my BOB (bug out bag). I would have liked to put more miles on my boots but we work with what we have. A two mile nature hike on a paved trail with little to no hills, so I was going to have to fix that somehow, this set the course for today. Three quarters into the hike, we crossed a bridge that spanned about 100 meters across and roughly 100 meter down from the center.  This may be a good chance for me to test a few of my rigging techniques and rope work, but that will come later with additional gear fitted to the pack.  After some thinking, this bridge was exactly what I needed to see how my pack would handle while scrambling down and back up to the other end.

This detour provided lose rocks, tall grassy paths, a cold stream, and ascends to a muddy path then finally scrambles back up to more sliding rocks. I begin by descending down the steep rocky embankment. With the earth beneath my feet giving way, I am forced to slow down and focus more on my footing.  Allow me to describe these misleading piles of rock, from a distance it would appear somewhat scenic and a good fit for the surrounding terrain but that is as far as the pleasantries go.  This loosely spilled pill of gravel sized from as large as basketballs may have seemed like it would stay put but each step would shift with the least amount of weight and dared to fall down away from me. Surprising thought afterwards I didn’t even remember that there was a pack on my back until I made it to flat ground. This passed the first of my tests, because of the internal frame design; it hugs very close to my back and would not throw my balance off, this pack actually moves with my movements. The grassy path didn’t provide much of a challenge either but what I did notice later was a barb wire fence that I had brushed against. Worried that perhaps I may have torn the pack, I had checked it for any damage and could not find any. Passing another important test, the durability factor showed that even small mishaps can be forgiven with this thing.  The next obstacle which I had to encounter was a small stream crossing; I had no real concern here because the water was only about a foot or so deep. A pair of good waterproof boots is a must and still no loss of balance treading across the calf deep current. Past the stream lay a muddy path uphill which was a bit taxing on the legs.  I was happy that this was where I was feeling the real muscles working.  You see, some packs will hang off your shoulders or sit against your back in an awkward way that will cause brutal back and/or shoulder pain.  Other packs such as external frame designs can even throw you off balance. This makes you fight constantly against gravity at weird angles so that you’re not falling. A real trekking pack will distribute the weight how you want it, where you want it, when you want it! This gave me the power I needed to dig in with my boots and not fall forward or backwards but ascend with ease. The final stretch to this detour was again the same kind of rocks as before.  The whole climb up was a breeze and I never really felt the weight of my 45 pound pack. Another note that this exceeded my expectations in performance is the load balance. Feeling really good about was a fun change of pace I felt that the last quarter mile of the journey to the car should be a jog. Racing my 10 year old son to the end of the trail; he was eating my dust when his mouth dropped to the ground in shock when I passed him.  You can run with this pack, though I would not recommend it because of possible joint problems later.

Things that worked out well for me

·       Internal frame allowed the pack to stay close to me and move with me during unforgiving ground

·       Pack kept weight distributed correctly that made the pack feel very light

·       Durable being beat up against trees and wire fences

Things to work on for next time:

·       How this is going to handle during wet conditions?

·       Longer treks will there be any pressure points?

·       How will it fair during a rappelling and rock climbing trip?

I am overly pleased with the trip it, bringing my wife and kids to a breezy and peaceful walking park, getting the opportunity to try something different, and share a memory with everyone. For me this is what real value is and worth more than its weight in gold in the end.  Internal frame packs is definitely the way to go if you’re in a rocky environment or you want to travel off the beaten path. These packs perform far better than external frame packs from what I can tell. My modifications are holding out better than expected (the shoulder harness suspension system that I re-did) and I can’t wait to continue to put this pack through more hell.  My next excursion will be a bluff that I will test with rappelling down the side of a 90 foot rock face and then try some bouldering.

          “Over all Obstacles!”

Saturday, March 2, 2013

Bug out Bag: CFP-90

360Survival:
   
My Bug Out Kit
     In the last year or so, I have stumbled across a few words like WROL (without rule of law), SHTF (shit hits the fan) and a BOB (bug out bag).  My name is Tony and I am an avid hiker, climber, and outdoor enthusiast  Like many others, I enjoy a good review on gear or a new way of doing things to see if it fits me,  after all there is a plethora of information on the Internet for anyone that has a curiosity at all for any given topic. My focus today is to join the people who feel that they have the ultimate bug out bag for prepping.  Humm, prepping, yes it seems that is new to me also even though I think many of us do this without even thinking about it.  We all prep when we do our grocery shopping or pay for next month’s bills, and what about bugging out? This sounds like just an extended camping trip or longer.  Okay, getting off topic some, I want to share my bug out kit with you and why I have chosen the items I have, as well as some things that i have learned. Over the time of building my kit it has continually EVOLVED and this can happen many time over quickly in a given month or very gradually over years.  I find this really cool because, as you learn and evolve so does your kit. So let’s get into the bag!
   
  Now I understand some of you will be saying, "Hey Tony, there's a lot of civilian packs that function way better than a military pack." and for some, that may be true, but this is My pack and I have over a decade of dealing with packs of every shape and size, this is what works for me. I don’t mind a little extra weight when i can get extra durability that this pack offers. Then internal frame CFP-90 (combat field pack- 1990) weighs in around 8 lbs. and holds around 4000 cubic inches, lots of PALS (Pouch Attachment Ladder System) and three smaller outside pouches. It was a tested item for the military as the IIFS (integrated individual fighting system) but never made it into the supply system long because of another system, the MOLLE (Modular Lightweight Load-bearing Equipment) that took its place.  An issue for some in the armed services for the CFP-90 was that it wasn't able to carry a mortar base plate and several hundred boxes of rounds well or broke under a 150 lbs. load. Now this may sound like this pack isn't worthy because of that flaw discovered by the mortar-men and other special operating groups but seriously, If any sane person ever tried to hike with any load more than 50 pounds they know its no walk in the park.  I have from my experience hiked with packs over 100 lbs and its one I could have done without and my back would be thanking me now since I’m getting older in the ages. No matter what pack you have, you have to be mindful of your ounces. If you carry everything and the kitchen sink in any type of pack, you will not get very far and you will suffer for it later, unless this is something you do every day and have a sick idea of fun. I love to go farther, faster, and harder when I'm outside and I get to see more, do more and I never feel the aches or pains later for it so i can do it again the next day with no problem. A little tip, keep it under 50, for many this will seem like a no brainer but believe me its super easy to fill a back and turn it heavy without realizing. Its much more challenging to leave things at home or do without.
     For the meat and potatoes of my pack I try to keep the basics of survival (Food, Fire, Water, and Shelter) without too much redundancy. I have also made some homemade modifications to improve it's carrying and adaptability options, which I researched the original design of the pack (the Alpine Lowe) found its strong points and brought it back. Also keep in mind that this pack is made for a cold weather situation while still being lightweight.
CFP-90 (winter setup or weather to reach below 40)
  • Sleeping bag (rated to minimum of 0)
  • Bivy bag - waterproofing against elements
  • Therm-a-rest sleeping pad- fight conduction-floatation aid
  • Gortex jacket and pants- shell system for layering
  • Thermals (base layer, and heavy layer)
  • Poncho- to many multi uses to list, shelter-rain protection-rain collection-tarp-boat, yes i said boat
  • E-blanket
  • Socks x 2, undershirt, swim shorts
  • Neck gaiter
  • Baklava
  • Dehydrated food for 3 days or more
  • Rat traps x2- lightweight, easy to use, meat producing items
  • burner- with fuel (i carry an penny stove, that can also use homemade solid fuel)
  • 2 quart canteen (clipped to outside)
  • GPS forerunner (typically against these but in a last ditch effort i keep mine off to save battery, learn to use compass like an expert)
  • Lightweight Water Filter (use with caution, filters and purifiers do different things)
  • Ducktape -this needs no explination if you have ever played with it
  • Folding Saw - this is actually a 50/50, some times i never need it but its so lightweight that when i do its worth gold for having one.

Top flap (get quick items)
  • Headlamp - night tasks
  • Cordage - multi use
  • Gloves
  • Bandana - multi use
  • Knife sharpening pocket system
  • Lighter
On- Person
  • Knife (Ontario U.S. pilot with kit)
    • fishing line/hooks
    • metal match
    • mini compass
    • sharpening stone
  • 550 cordage- great for so many things from traps to shelter building
  • Lenstatic compass/ map
  • Lighter
  • Canteen/ with cup and stove stand/ iodine tablets
  • High calorie bar
  • Pencil/paper
  • Fleece hat - i shave my head so this is critical for me, LOL
     I prefer woodland camouflage mainly because when i get out in the woods, I also hunt but most importantly to me is the leave no trace princlepal which I will share in a later blog. The idea of my pack is that it is my lightweight RV or pop up camper. It stays under 45 lbs. so it is light for me to travel without any discomfort and unloads to everything to brave the elements comfortably using the BRACE and Layering concepts. If I have to ditch the pack for whatever reason there is a redundancy on my person for a reason so I can still improvise everything i need on my on-person gear.
     This is my pack that works great for me in a bug out situation, hiking excursion, camping trip, and stays either in my truck while im at work or near by if i need to grab-n-go because it stays packed. If you have any comments or other ideas feel free to share. 
                                                                         "Over all Obstacles!"